


While the temperature in Dallas right now doesn’t scream Fall, that doesn’t mean you can’t get yourself an (iced) Pumpkin Spice Latte and put some fall decorations up. After all, if you decorate for it, it will come. Right?
So as you’re planting mums and arranging the pumpkins on the porch, here’s an idea for a quick and easy Burlap Fall Wreath for the front door. Its also makes for a transitional decoration to make tweaks to as the seasons and holidays change.

![]()
This fall wreath was a naptime craft for me and took less twenty minutes from start to finish. I would consider this a beginner level #DMBDIY.
I chose three different styles of burlap, but it certainly works with all the same color. I plan to pull out the orange and swap with red as it gets closer to Christmas.
And just a tip from my own personal experience, all the big craft stores in Dallas carry an assortment of burlap, but Super Wal-Mart had the best price. Who would have thought? I was shocked they even had it, but it was less than half the price of the big craft stores (even with coupons).
Materials You’ll Need
- Wire wreath frame
- 3-4 rolls of burlap (I used 1.5 plain, 1 chevron and 1 orange)
- Pipe cleaners (ideally the same color as your burlap, but you really don’t see them)
- Embellishments or floral picks (optional)
Let’s get started, shall we?
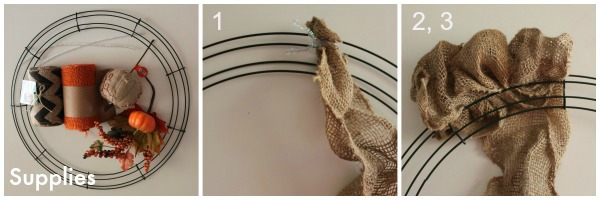
- Starting with the outermost ring first. Attach a pipe cleaner to the back of the frame and then twist it around the end of your first roll of burlap.
- Pull a loop of burlap through the outermost ring of the frame, Always pull the burlap from the back through to the front.
- Continue to pull loops of burlap, again, always from back to front and work your way around the outer ring. You can make them as big and fluffy or as tight as you want. That’s a matter of personal preference.
- You may run out of burlap midway through, so wherever your end is, just use a pipe cleaner to attach it to the frame and start a new piece.
- Once you get all the way around, you will use a pipe cleaner to attach your end to your frame.
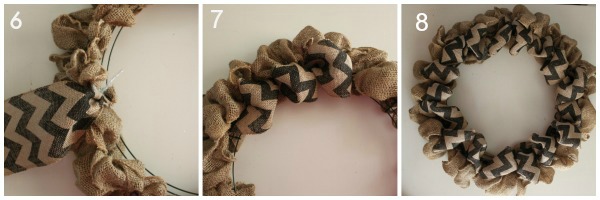
- Now you are ready to m ove onto the next ring – and next color/pattern of burlap.
- Repeat the same steps you did for attaching and pulling the burlap in the first ring.
- Secure your second row of burlap to the frame using a pipe cleaner.
- Now you are ready for the innermost, and final ring, of the wreath.
- You’re almost finished. Repeat the same steps as above, attach burlap and pull loops through this last ring
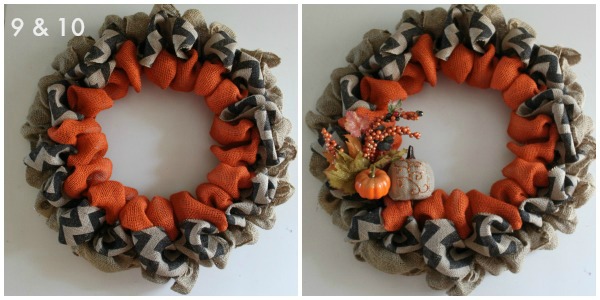
Voila! You are either finished or ready to add some embellishments.
Embellishments are totally optional depending on where you fall on the Less is More or More is More scale. I used a few floral picks I found at Hobby Lobby a few weeks ago. I chose not to glue mine in place in the event I want to switch them out in the future. I just sort of jammed mine down into the burlap and wiggled it around until it was to my liking.
So, now that your front door is festive and ready for fall, go inside and light a pumpkin spice candle, bake some pumpkin spice muffins and pretend its 60 degrees outside.


Hi Amanda! Love this wreath! Where did you purchase your supplies? I’ve got the wire, plain burlap, but where did you get the chevron & orange burlap ribbon?
Cheryl, I saw the burlap at Walmart.
Thanks! I love this wreath, too. I found the orange burlap at Walmart. Since writing the post, I have swapped out that orange for other seasonal colors and I have actually seen a big variety of colored burlap popping up at Hobby Lobby, Joann’s and Michaels. All three of those craft stores accept each other’s coupons…so be sure to bring one in or download it to your phone for extra savings!
Hello Amanda! Just love this wreath and finally somebody is using more than one kind of burlap. Am just curious how you pulled the burlap through? Did you made any twist in between so it will hold?
Hi Kerstin – I have seen a method where you twist the burlap before you pull through, and that will definitely give it extra staying power. I used a pretty wide burlap, so I did not do any twisting because it stayed in place on its own. Here we are almost a year later and the burlap hasn’t budged. However you can do what works best for you – pull through and fluff, or twist – pull through – fluff.
Did you get everything from Walmart or just the burlap ?
Hi Rachel, I got the wreath frame and seasonal decorative picks at Hobby Lobby. However, I have seen the wire frames at Wal-Mart in the floral/craft section. Burlap was purchased at Wal-Mart.
what size wire wreath did you get?
Hi Brooke, the wreath frames come in a variety of sizes but the one I used is 16 in. I made a small one for my daughter’s playhouse. And I have seen some massive wreaths…but on our front door, which I think is an average sized door, 16 in worked best.
Love this wreath but the burlap looks alot bigger in width that 1 1/2 inches as said in the list of things needed…If so what width did you use? Thanks
What width of burlap ribbon? In the list of items needed, it kinda sounds like it’s 1 1/2 inch…but this is way to thin…
Hi Dorothy – so sorry for the confusion! The 1 1/2 is referring to how many rolls of burlap I used. However I just measured and the burlap is 5 inches wide. The burlap ‘ribbon’ I used to make the bow is 2.5 inches wide. I hope that helps! Feel free to post any further questions here and I will get back to you as soon as I can!
I am just curious how you get each burlap loop to stay after you pull it through from the back? I have done an all burlap one and used the weaving method for that one.
How many yards were each roll of burlap you used?
I am with Lori above! I adore this wreath but am working on trying to make one right now but cannot get my burlap loops to stay when just using one ring per color. I’ve done the weaving method as well. Can’t figure out what I’m doing wrong! 🙂
Hi Amanda when you are making the loops do you go around the wire or is it just pushed through the slots and not wrapped to stay in place.